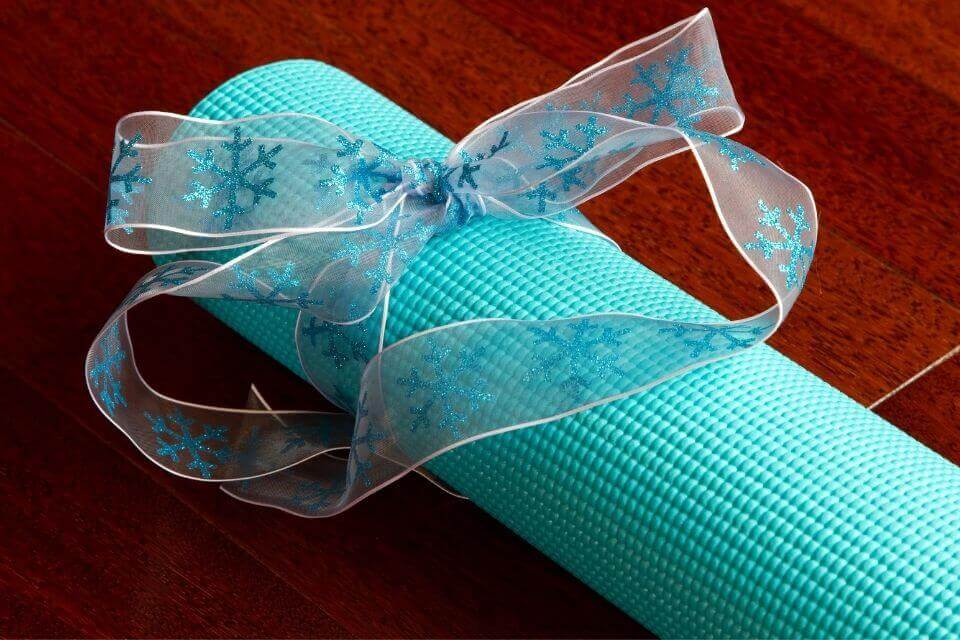
One of the best moments in life is seeing the joy on a loved one’s face when handed gifts. It’s hard to miss it when the person is really into yoga. And paying attention to that passion can easily direct anyone toward the perfect present. Since yoga does not require the usage of other equipment but a mat, it is necessary to invest in it. To make complicated yoga poses more convenient, a yoga mat is of utmost importance during the sessions. This makes it a good gift idea for yoga practitioners. A yoga mat is a large, odd, cylinder-shaped object, so gift-wrapping seemed like a challenging task.
Gift wrapping is not just about covering the gift in decorative paper. It is about going one step further; it is like a beautifully decorated dish at a restaurant or the icing on the cake. It adds another dimension and is the final flourish that completes any good gift. And for the recipient, it is about the anticipation, the excitement of discovering what is inside.
2 Ways to Make Gift Wrapping a Yoga Mat Easy
1. ROLL IT UP
Anyone can breathe easily with this manageable mat-wrapping method. With only five items needed on the supply list, this yoga gift idea is straightforward.
What you need:
- Craft paper/Cloth
- Tape
- Ribbon
- Scissors
- Twine
How to do it:
We want the gift wrap to look smooth and nice, so to achieve that, we need to start by cutting the wrapping paper down to the correct measurements. For people who would like to use a paperless material, any fabric can be used like a scrap piece of cloth, headscarf, or a tea towel, instead of paper.
Lay the yoga mat on the paper or cloth and set the length so that the paper reaches precisely up to the middle of the circle on the edge of the mat, on both sides. If the paper or cloth is too short, it won’t cover all the edges. If it’s too long, it will look bunched up instead of nice and pleated. Make sure to cut the paper or cloth to the correct size using the scissors.
The width of the paper or cloth should be a bit more than just enough to wrap around the yoga mat. It is better to avoid wrapping more than once around. Also, leftover paper or cloth can still be recycled and used for other things. Tape one edge of the paper or cloth to the middle of the yoga mat using transparent tape.
Then tape double-sided tape along the inside of the other edge, but do not remove the cover paper yet. Wrap the paper or cloth around the mat, and then pull the cover paper gradually while pressing the paper to the mat with your fingers.
Press the paper or cloth on one of the edges onto the edge circle – it should reach the middle of the circle. Start folding and pleating the paper or cloth around the circle. Press each pleat on top of the previous one. After pleating the entire edge, tape the pleats down using transparent tape. Then do the same steps on the other edge of the yoga mat.
Once the pleats at the edges look pretty and nice, this step can be skipped. This step is not necessary for people using cloth instead of paper. However, for people doing this for the first time or those not satisfied with the pleats, it is suggested to do this step. The edges can be improved by gluing paper circles in the middle of the edges.
Leftover scraps of the wrapping paper can be laid upside down. Use a jar and a pencil to mark two circles. Then cut the circles and glue them to the middle of each edge of the yoga mat.
Now that the yoga mat cylinder is wrapped up, all that is left is decorating the gift. Use a smaller piece of paper in a different color than the large wrapping paper, wrap it around the middle of the cylinder, and tie a jute twine for a finishing touch. Anyone can also try using fabric ribbon or natural fiber yarn in place of plastic ribbon. They can be reused for future holidays or turned into new craft projects.
2. TISSUE PAPER TECHNIQUE
This technique for how to wrap a yoga mat involves stacking craft paper and tissue. With a similar look to a candy wrapper, this approach lets anyone give the appearance of something sweet before a yoga practitioner works up a sweat.
What you need:
- Tissue paper
- Craft paper
- Tape
- Double-sided tape
- Ribbon
- Scissors
How to do it:
Using double-sided tape, tape the tissue paper together to make the sheet larger than the size of the mat.
Place the mat in the center of the paper and roll.
After measuring how much wrapping paper is needed to get around the object’s length, the trickier part is figuring out how much paper is required to cover the ends.
Locate the center of the circle and make sure the side of the wrapping paper reaches that center about halfway up.
Once there is enough paper to make a series of creases to wrap around the gift nicely. This may take some time and patience, but the result should look like a pinwheel sort of pattern.
Tape the paper closed after wrapping.
Then wrap a sheet of craft paper around the center of the mat to create a band. Tape it closed.
On each end, tie the excess tissue paper with a ribbon. Same with the first technique, anyone can also try using fabric ribbon or natural fiber yarn in place of plastic ribbon.
The wrapping of gifts points to an essential experience, a way human has learned to frame objects to designate them as special. Be it a simple or a recycled wrap, and every gift is still better with one.