Are you new to yoga? Or have you been practicing for a while but find some poses not yet accessible to you? Do you want to go deeper into some postures you’ve been practicing for some time now? Then I’d like to introduce you to your new friend – the wall. Yes, the wall! That sturdy, concrete structure in your room, house, office, studio, gym, you get what I mean.
The wall is a reliable, practical, and accessible prop that is very useful for your asana practice. Here’s how: the wall serves as a spotter that you can trust to stabilize you when you come into balancing or inversion poses, it also serves as a guide to proper alignment, to intensify or deepen a pose, to modify for more accessibility, to open or bring awareness to some parts of your body, or simply to help you get into challenging wall yoga poses with ease.
Wall Yoga Poses
Here are some of the poses you can do with the help of the wall which is suitable to any level you are in your practice.
Inverted Lake Pose / Legs Up the Wall (Viparita Karani)
This is a restorative inversion that increases blood circulation to the abdominal organs, relieves edema or congestion in the legs and reverses the effects of gravity on the entire body. You basically get the benefits of an inversion with minimal effort.
How to get into the pose:
- Place a bolster or neatly folded blankets (1-2) at the bottom of the wall.
- Lie down on the floor with the back waist on top of the bolster or blankets, raise your legs up the wall with the sitting bones, back of the thighs and calf touching the wall.
- Extend your arms out to the side, turn the palms up to face the ceiling.
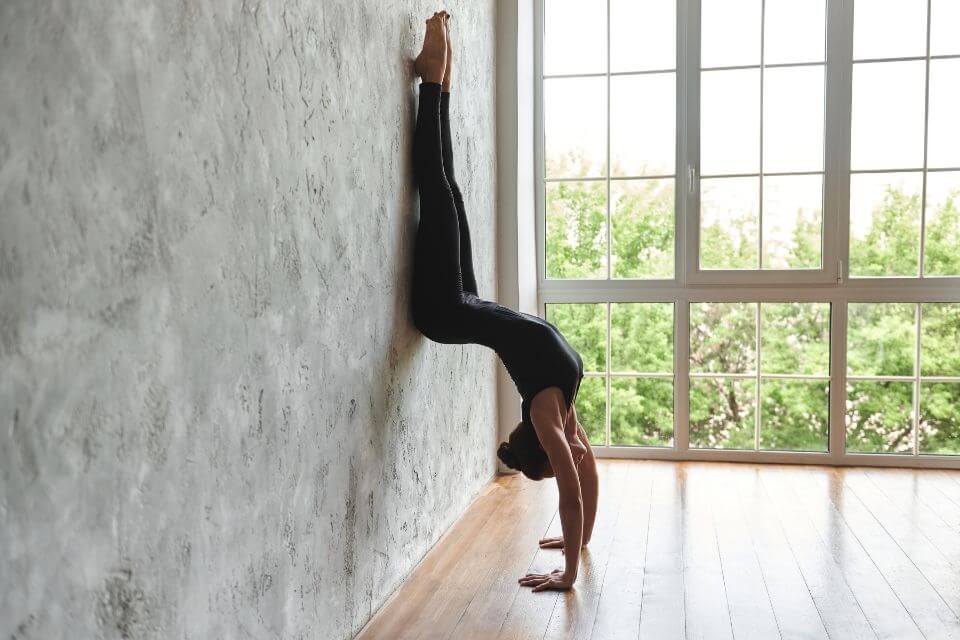
Standing Forward Bend (Uttanasana)
This is a soothing pose to release the hamstrings, stretch the legs, and lower your blood pressure. Do this in front of a wall to deepen the posture.
How to get into the pose:
- Stand and face your backside to the wall about 6 to 10 inches away.
- Separate your feet hip-width distance apart, reach your arms up, lengthen your torso and fold forward with your knees slightly bent.
- Relax the neck, let the head hang, clasp the opposite elbows with your hands or interlace your fingers behind, straighten the arms, and reach the knuckles up towards the ceiling.
- To go deeper, you can simply walk your feet back closer to the wall as close as you can keep your balance.
King Arthur’s Pose
This is a great pose to stretch out the thighs, hip flexors, and psoas muscles. It is also a good preparation pose for backbends because it lengthens the muscles of your lower body. This might feel a bit intense and shouldn’t be done if you have any knee problems. Use a blanket under your knees if you have sensitive knees.
How to get into the pose:
- Come into tabletop position, curl your toes under and bring the back of your heels to touch the wall.
- Take your left bent knee to the base of the wall (where the wall meets the floor) and slide the shin and the tops of your feet to the wall then point the toes up.
- Step the right foot forward and stack the right knee over the ankle about 90 degrees.
- Lift the torso up and move your back towards the wall.
- Lengthen the tailbone down.
- Lift the arms up overhead. (Repeat on the other leg)
Half Moon Pose (Ardha Chandrasana)
This is a balancing pose that improves coordination and concentration. It also strengthens the knees and the lateral muscles of the leg. Use the wall for this pose as a stabilizer to get the benefits when balancing is a challenge for you.
How to get into the pose:
- Stand in Mountain Pose about 5 inches from the wall, facing away from it.
- Separate your feet wide about 3-4 feet apart.
- Turn the right leg out and the left leg slightly in.
- Bend the right leg and stack the right knee over the ankle about 90 degrees.
- Bring the fingers of your right hand down (like holding a cupcake or use a block to bring the height of the floor up) to the floor about 1 foot away from your right toes.
- When stable, straighten the right knee and lift the back leg straight to the height of the hips.
- Reach the left hand up towards the ceiling and gaze at the left thumb. (Repeat on the other side)
Tree Pose (Vrksasana)
This is also a good balancing pose that is grounding and tones the legs. Use the wall to aid in balance.
How to get into the pose:
- Stand in Mountain Pose about 10 inches from the wall, with your right side-body facing the wall.
- Bring the right hand to the wall to the height of your shoulders.
- Shift your weight to the right leg.
- Turn the left leg out, bend your left knee and bring the sole of your left knee to the inner right thigh, left toes pointing down toward the ground.
- Draw the tailbone down, lift the chest up and soften the frontal rib points down.
- Widen the collarbones and lift the left arm up.
- If you get your balance, maybe also raise the right arm up.
- The wall is there to lean on if you need to. (Repeat on the other side)
Side Plank (Vasisthasana)
This is an arm balance that strengthens the wrists, arms, and shoulder muscles. It also tones the abdominal area, legs, and hips.
How to get into the pose:
- Begin in plank with your right side-body facing the wall about 5-10 inches away.
- Move the left hand and left foot to the right to meet your right hand and foot.
- Draw the belly in and shift your weight to the right arm as you turn and open your front body to the left side, stack the hips and the left foot on top of the right balancing on the outer edge of the right foot.
- Use the wall to stabilize, raise the left arm up to the ceiling. (Repeat on the other side)
Puppy Dog Pose (Adho Mukha Svanasana variation/preparation)
This is a good posture to stretch the hamstrings and loosen the shoulder muscles. Lengthens the entire back and spinal muscles.
How to get into the pose:
- Stand in Mountain pose facing the wall.
- Place both hands on the wall shoulder-width distance apart at the height of your hips.
- Keep this alignment and step back until your arms and torso are parallel to the floor.
- Separate your feet hip-width distance apart and parallel.
- Stack your hips over your feet.
- Straighten both legs.
- Press your hands firmly to the wall as you try to reach the hips towards the back further stretching and lengthening the spine.
Extended Triangle Pose (Utthita Trikonasana)
This pose relieves backaches, sciatica, and sacroiliac pain. Also tones the legs and opens the hips. Use the wall to stabilize the pose and to align your triangle.
How to get into the pose:
- Stand in Mountain pose about 5-10 inches away from the wall, facing away from it.
- Separate your feet about 3 feet apart.
- Turn the right leg out and the left leg slightly in.
- Hinge from the crease of the right hip and reach farther out to the right with your right hand an torso, then lower the right hand to the shin or ankle or the floor, wherever it is accessible to you.
- Raise the left arm up and create a straight line from the top hand to the bottom hand.
- Try to revolve the bottom rib by bring it forward and the top rib back toward the wall. (Repeat on the other side)
Warrior 3 (Virabhadrasana 3)
This pose improves your coordination and balance. It strengthens the abdominal area, back, and leg muscles. Use the wall as support to stabilize the pose and ease the challenge of maintaining alignment.
How to get into the pose:
- Stand in Mountain pose about your leg’s length, facing away from the wall.
- Shift your weight to the right leg, lift the left leg straight back and place the sole of the left foot on the wall (toes pointing down) to the height of your hips as you lower the torso forward.
- Square the hips and bring the hands in prayer position in front of your chest or press the left foot firmly onto the wall and extend the arms out forward then turn the palms to face each other.
Camel Pose (Ustrasana)
This challenging backbend pose is good for stretching the hip flexors, thighs, and abdominal muscles. It improves flexibility in the upper spine (thoracic). It also opens the shoulders and chest. Use the wall to correctly alight the hips and knees, and for support in deepening the pose. Use a blanket under your knees if you have sensitive knees.
How to get into the pose:
- Face the wall and kneel down on floor where the wall and the floor meet.
- Separate your knees and feet hip-width distance apart.
- Curl your toes under and press the frontal hip points, pelvis, and thighs and onto the wall.
- Place your hands on the back hips just above your buttocks with your fingers pointing down.
- Relax your buttocks and draw the tailbone down.
- Hug the elbows in towards each other to draw the shoulder heads back.
- Lift the chest up to the ceiling without losing hip contact with the wall.
- Option to stay here or reach down and place your hands on your heels.
- Let your head relax back and focus on lifting the chest up.
Remember to breathe, take your time in getting in and out of these poses. Rest if you need to. Explore other ways to utilize the wall in assisting you with your postures. Ease and comfort cultivate a safe space for you that will help you achieve peace in your yoga practice. Namaste.